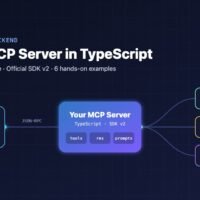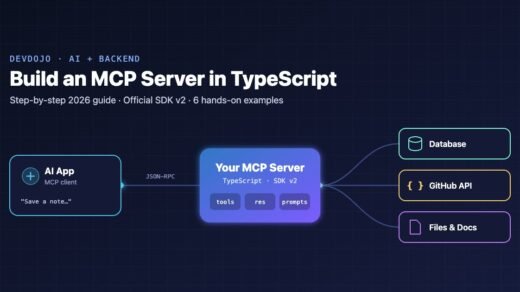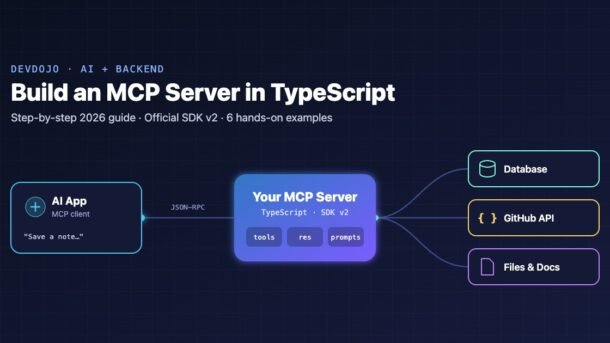
AI assistants are only as useful as the data and tools they can reach. The Model Context Protocol (MCP) is the open standard that lets apps like Claude, ChatGPT, VS Code and Cursor talk to your own APIs, databases and files in one consistent way. In this guide you will build an MCP server in TypeScript from scratch using the official SDK v2, with six hands-on examples: tools, error handling, a real API integration, resources, prompts, a test client, and a remote HTTP server.
- Install
@modelcontextprotocol/serverandzod. - Create an
McpServer, register tools (actions), resources (data) and prompts (templates). - Every code snippet is a copy-paste bash command.
- Run it with
serveStdio()locally, or over Streamable HTTP for remote users. - Test with MCP Inspector, then plug it into Claude, VS Code or Cursor.
What is the Model Context Protocol (MCP)?
MCP is a protocol (built on JSON-RPC 2.0) that defines how an AI application discovers and uses capabilities exposed by a program you write. Think of it as “USB-C for AI”: build your server once, and every MCP-compatible app can plug into it.
There are three roles:
- Host – the AI app the user talks to (Claude Desktop, VS Code, Cursor, your own chatbot).
- Client – a connector inside the host that keeps a 1:1 connection with one server.
- Server – your program that exposes tools, resources and prompts.
The three building blocks
Tools
Actions the AI decides to call, like add-note or get-repo.
Resources
Read-only data the app can load as context: files, configs, database rows.
application-controlledPrompts
Reusable templates the user picks, often shown as slash commands.
user-controlledWhy build your own MCP server?
- Give AI access to your data – internal APIs, product database, docs, logs, tickets.
- Write once, use everywhere – one server works across many AI apps and agent frameworks.
- Stay in control – you decide exactly which actions are possible and validate every input.
- Great portfolio project – MCP skills are in demand for AI engineering and backend roles.
How an MCP request works (interactive)
Click each step to see the actual JSON-RPC messages exchanged when a user says “Save a note called Sprint goals”.
When the app starts your server, the client introduces itself and both sides agree on a protocol version and capabilities.
{
  "jsonrpc": "2.0",
  "id": 1,
  "method": "initialize",
  "params": {
    "clientInfo": { "name": "my-ai-app", "version": "1.0.0" },
    "capabilities": {}
  }
}The client asks tools/list. Your server answers with each tool’s name, description and JSON Schema (generated from Zod). The AI reads these descriptions to decide what to call.
{
  "jsonrpc": "2.0",
  "id": 2,
  "result": {
    "tools": [{
      "name": "add-note",
      "description": "Save a new note with a title and body",
      "inputSchema": {
        "type": "object",
        "properties": {
          "title": { "type": "string", "minLength": 1 },
          "body":  { "type": "string" }
        },
        "required": ["title", "body"]
      }
    }]
  }
}The model decides add-note fits the user’s request and fills in the arguments. The client sends tools/call.
{
  "jsonrpc": "2.0",
  "id": 3,
  "method": "tools/call",
  "params": {
    "name": "add-note",
    "arguments": { "title": "Sprint goals", "body": "Finish login page" }
  }
}Your handler runs and returns content. The AI uses it to reply to the user: “Done! I saved note #1, Sprint goals.”
{
  "jsonrpc": "2.0",
  "id": 3,
  "result": {
    "content": [{ "type": "text", "text": "Saved note #1: Sprint goals" }],
    "isError": false
  }
}
Good news: the SDK handles all of this JSON-RPC plumbing for you. You only write the handler functions.
Prerequisites
- Node.js 20+ (check with
node -v) - npm, pnpm or yarn
- Basic TypeScript and async/await (new to async? read our JavaScript Promises guide first)
Step 1: Set up the project
# 1. Create the project folder
mkdir notes-mcp && cd notes-mcp
npm init -y

# 2. Install the MCP server SDK (v2) + Zod for input validation
npm install @modelcontextprotocol/server zod

# 3. Dev tools: TypeScript, tsx (run .ts directly) and Node types
npm install -D typescript tsx @types/node

# 4. Create the folders we'll use
mkdir -p src/tools
Every snippet in this guide is a copy-paste bash command: paste it into your terminal inside the notes-mcp folder and the file is created for you. Start with package.json (ES modules + handy scripts):
# Overwrite package.json with ES modules + handy scripts
cat > package.json <<'EOF'
{
  "name": "notes-mcp",
  "version": "1.0.0",
  "type": "module",
  "scripts": {
    "dev": "tsx src/index.ts",
    "build": "tsc",
    "start": "node dist/index.js",
    "inspect": "npx @modelcontextprotocol/inspector npx tsx src/index.ts"
  }
}
EOF

# npm init cleared the dependency list, so re-add it
npm install @modelcontextprotocol/server zod
npm install -D typescript tsx @types/node
Then create tsconfig.json:
cat > tsconfig.json <<'EOF'
{
  "compilerOptions": {
    "target": "ES2022",
    "module": "NodeNext",
    "moduleResolution": "NodeNext",
    "outDir": "dist",
    "rootDir": "src",
    "strict": true,
    "esModuleInterop": true,
    "skipLibCheck": true,
    "types": ["node"]
  },
  "include": ["src"]
}
EOF@modelcontextprotocol/server and @modelcontextprotocol/client. Many older tutorials use @modelcontextprotocol/sdk; that is v1. The official SDK ships a codemod to help migrate.By the end of this guide your project will look like this:
$ tree -I node_modules
notes-mcp/
├── src/
│   ├── index.ts          # stdio entry point
│   ├── server.ts         # builds the McpServer and registers everything
│   ├── store.ts          # in-memory notes store
│   ├── resources.ts      # resources (Example 4)
│   ├── prompts.ts        # prompts (Example 5)
│   ├── http.ts           # remote HTTP entry point
│   ├── test-client.ts    # automated smoke test (Example 6)
│   └── tools/
│       ├── notes.ts      # add / list / search (Example 1)
│       ├── admin.ts      # delete / get with errors (Example 2)
│       └── github.ts     # GitHub API tool (Example 3)
├── package.json
└── tsconfig.json
Example 1: A notes server with tools
Let’s start with the classic first project: a notes server the AI can use to add, list and search notes. We keep the store, the tools and the server in separate files so we can reuse them for both stdio and HTTP later. Paste this whole block into your terminal:
# ── src/store.ts: a tiny in-memory store (swap for a database later) ──
cat > src/store.ts <<'EOF'
export type Note = { id: number; title: string; body: string; createdAt: string };

export const notes = new Map<number, Note>();
let nextId = 1;

export function addNote(title: string, body: string): Note {
  const note = { id: nextId++, title, body, createdAt: new Date().toISOString() };
  notes.set(note.id, note);
  return note;
}
EOF

# ── src/tools/notes.ts: add / list / search tools ──
cat > src/tools/notes.ts <<'EOF'
import type { McpServer } from '@modelcontextprotocol/server';
import * as z from 'zod/v4';
import { notes, addNote } from '../store.js';

export function registerNoteTools(server: McpServer) {
  // ➊ Add a note
  server.registerTool(
    'add-note',
    {
      description: 'Save a new note with a title and body. Returns the new note id.',
      inputSchema: z.object({
        title: z.string().min(1).describe('Short title, e.g. "Sprint goals"'),
        body: z.string().describe('The note content')
      })
    },
    async ({ title, body }) => {
      const note = addNote(title, body);
      return { content: [{ type: 'text', text: `Saved note #${note.id}: ${title}` }] };
    }
  );

  // ➋ List all notes
  server.registerTool(
    'list-notes',
    {
      description: 'List all saved notes with their ids and titles',
      inputSchema: z.object({})
    },
    async () => {
      const text = notes.size
        ? [...notes.values()].map(n => `#${n.id} ${n.title}`).join('\n')
        : 'No notes yet.';
      return { content: [{ type: 'text', text }] };
    }
  );

  // ➌ Search notes by keyword
  server.registerTool(
    'search-notes',
    {
      description: 'Search notes by keyword in the title or body',
      inputSchema: z.object({ query: z.string().min(1) })
    },
    async ({ query }) => {
      const q = query.toLowerCase();
      const found = [...notes.values()].filter(
        n => n.title.toLowerCase().includes(q) || n.body.toLowerCase().includes(q)
      );
      const text = found.length
        ? found.map(n => `#${n.id} ${n.title}: ${n.body}`).join('\n')
        : `No notes match "${query}".`;
      return { content: [{ type: 'text', text }] };
    }
  );
}
EOF

# ── src/server.ts: build the server (we'll add more modules later) ──
cat > src/server.ts <<'EOF'
import { McpServer } from '@modelcontextprotocol/server';
import { registerNoteTools } from './tools/notes.js';

export function createServer() {
  const server = new McpServer({ name: 'notes', version: '1.0.0' });
  registerNoteTools(server);
  return server;
}
EOF
Now the stdio entry point, which is all a desktop AI app needs to launch your server:
cat > src/index.ts <<'EOF'
import { serveStdio } from '@modelcontextprotocol/server/stdio';
import { createServer } from './server.js';

serveStdio(() => createServer());
EOF

# Quick check: open the Inspector and try the 3 tools
npm run inspect
How it works:
McpServercreates the server with a name and version that clients will see.registerTool(name, config, handler)exposes a function. The description is crucial – the AI reads it to decide when to call your tool.inputSchemauses Zod. Invalid input is rejected before your handler runs, and.describe()gives the AI extra hints for each field.serveStdiocommunicates over standard input/output – that’s how local servers talk to desktop apps.
Example 2: Handling errors the right way
AI models make mistakes – for example, asking to delete a note that doesn’t exist. Return a helpful error so the model can recover instead of failing silently. There are two ways:
cat > src/tools/admin.ts <<'EOF'
import type { McpServer } from '@modelcontextprotocol/server';
import * as z from 'zod/v4';
import { notes } from '../store.js';

export function registerAdminTools(server: McpServer) {
  // ➍ Delete a note – Option A: return isError with a helpful message
  server.registerTool(
    'delete-note',
    {
      description: 'Delete a note by its numeric id',
      inputSchema: z.object({ id: z.number().int().positive() })
    },
    async ({ id }) => {
      if (!notes.has(id)) {
        return {
          content: [{
            type: 'text',
            text: `No note with id ${id}. Known ids: ${[...notes.keys()].join(', ') || 'none'}`
          }],
          isError: true
        };
      }
      notes.delete(id);
      return { content: [{ type: 'text', text: `Deleted note #${id}` }] };
    }
  );

  // ➎ Get one note – Option B: just throw; the SDK turns it into an isError result
  server.registerTool(
    'get-note',
    {
      description: 'Get the full content of one note by id',
      inputSchema: z.object({ id: z.number().int().positive() })
    },
    async ({ id }) => {
      const note = notes.get(id);
      if (!note) throw new Error(`Note #${id} not found`);
      return { content: [{ type: 'text', text: `${note.title}\n\n${note.body}` }] };
    }
  );
}
EOF
Tip: Listing the valid ids in the error (like Option A) lets the AI fix its own mistake on the next try. Small detail, big improvement.
Example 3: Calling a real API (GitHub)
Most useful MCP servers wrap an existing API. Here’s a tool that fetches live stats for any public GitHub repository. Node 20+ has fetch built in, so no extra packages are needed.
cat > src/tools/github.ts <<'EOF'
import type { McpServer } from '@modelcontextprotocol/server';
import * as z from 'zod/v4';

export function registerGithubTools(server: McpServer) {
  // ➏ Get GitHub repository info
  server.registerTool(
    'get-github-repo',
    {
      description: 'Get stars, forks, open issues and language for a public GitHub repo',
      inputSchema: z.object({
        owner: z.string().describe('Repo owner, e.g. "facebook"'),
        repo: z.string().describe('Repo name, e.g. "react"')
      })
    },
    async ({ owner, repo }) => {
      const headers: Record<string, string> = {
        'Accept': 'application/vnd.github+json',
        'User-Agent': 'notes-mcp'
      };
      // Optional: higher rate limits with a token from your environment
      if (process.env.GITHUB_TOKEN) {
        headers.Authorization = `Bearer ${process.env.GITHUB_TOKEN}`;
      }

      const res = await fetch(`https://api.github.com/repos/${owner}/${repo}`, { headers });
      if (res.status === 404) throw new Error(`Repository ${owner}/${repo} not found`);
      if (!res.ok) throw new Error(`GitHub API error: ${res.status} ${res.statusText}`);

      const data = await res.json();
      const summary = [
        `📦 ${data.full_name}`,
        `${data.description ?? 'No description'}`,
        `⭐ Stars: ${data.stargazers_count}`,
        `🍴 Forks: ${data.forks_count}`,
        `🐞 Open issues: ${data.open_issues_count}`,
        `💻 Language: ${data.language ?? 'n/a'}`,
        `🔗 ${data.html_url}`
      ].join('\n');

      return { content: [{ type: 'text', text: summary }] };
    }
  );
}
EOF

# Optional: export a token for higher GitHub rate limits
export GITHUB_TOKEN=ghp_your_token_here
Now you can ask your AI: “Compare the stars of facebook/react and vuejs/core” – it will call the tool twice and compare the results for you.
process.env) and pass them in your client config (shown later).Example 4: Exposing data with resources
Resources are read-only data the AI app can load as context – without the model needing to “call” anything. Use a fixed URI for single items, or a ResourceTemplate for dynamic ones.
cat > src/resources.ts <<'EOF'
import { McpServer, ResourceTemplate } from '@modelcontextprotocol/server';
import { notes } from './store.js';

export function registerResources(server: McpServer) {
  // Static resource: app configuration
  server.registerResource(
    'config',
    'config://app',
    {
      title: 'Application Config',
      description: 'Current notes app settings',
      mimeType: 'text/plain'
    },
    async uri => ({
      contents: [{ uri: uri.href, text: 'max_notes=500\ndefault_tag=general' }]
    })
  );

  // Dynamic resource: any single note by id, e.g. notes://3
  server.registerResource(
    'note',
    new ResourceTemplate('notes://{id}', {
      // list lets clients discover every available note
      list: async () => ({
        resources: [...notes.values()].map(n => ({
          uri: `notes://${n.id}`,
          name: n.title
        }))
      })
    }),
    {
      description: 'A single note as JSON',
      mimeType: 'application/json'
    },
    async (uri, { id }) => {
      const note = notes.get(Number(id));
      if (!note) throw new Error(`Note ${id} not found`);
      return {
        contents: [{ uri: uri.href, mimeType: 'application/json', text: JSON.stringify(note, null, 2) }]
      };
    }
  );
}
EOF
🔒 Bonus: safely serving files from a docs folder
If a resource reads files from disk, always make sure the path can’t escape your folder (a “path traversal” attack like ../../.env):
mkdir -p docs && echo "# Hello from the docs folder" > docs/intro.md

cat > src/docs-resource.ts <<'EOF'
import { McpServer, ResourceTemplate } from '@modelcontextprotocol/server';
import { readFile, realpath } from 'node:fs/promises';
import path from 'node:path';

const DOCS_ROOT = path.resolve('./docs');

export function registerDocsResource(server: McpServer) {
  server.registerResource(
    'doc',
    new ResourceTemplate('docs://{file}', { list: undefined }),
    { description: 'A markdown page from the docs directory', mimeType: 'text/markdown' },
    async (uri, { file }) => {
      const requested = await realpath(path.join(DOCS_ROOT, String(file)));
      if (!requested.startsWith(DOCS_ROOT + path.sep)) {
        throw new Error(`${uri.href} resolves outside the docs root`);
      }
      return { contents: [{ uri: uri.href, text: await readFile(requested, 'utf8') }] };
    }
  );
}
EOF
Example 5: Reusable prompts
Prompts are templates users pick from a menu or slash command in the AI app. They’re perfect for repeatable workflows like code review or summarising notes.
cat > src/prompts.ts <<'EOF'
import type { McpServer } from '@modelcontextprotocol/server';
import * as z from 'zod/v4';
import { notes } from './store.js';

export function registerPrompts(server: McpServer) {
  // Prompt 1: code review
  server.registerPrompt(
    'review-code',
    {
      title: 'Code Review',
      description: 'Review code for bugs, performance and best practices',
      argsSchema: z.object({
        code: z.string().describe('The code to review'),
        language: z.string().optional().describe('e.g. TypeScript, Python')
      })
    },
    ({ code, language }) => ({
      messages: [{
        role: 'user' as const,
        content: {
          type: 'text' as const,
          text: `You are a senior ${language ?? ''} developer. Review this code. ` +
                `List bugs, performance issues and improvements, with fixed code:\n\n${code}`
        }
      }]
    })
  );

  // Prompt 2: summarise all notes
  server.registerPrompt(
    'summarize-notes',
    {
      title: 'Summarize my notes',
      description: 'Create a short summary and action items from all saved notes',
      argsSchema: z.object({})
    },
    () => ({
      messages: [{
        role: 'user' as const,
        content: {
          type: 'text' as const,
          text: 'Summarize these notes in 5 bullet points, then list action items:\n\n' +
                [...notes.values()].map(n => `- ${n.title}: ${n.body}`).join('\n')
        }
      }]
    })
  );
}
EOF
Wire everything together
Now register every module in server.ts and type-check the project:
# Wire every module into the server
cat > src/server.ts <<'EOF'
import { McpServer } from '@modelcontextprotocol/server';
import { registerNoteTools } from './tools/notes.js';
import { registerAdminTools } from './tools/admin.js';
import { registerGithubTools } from './tools/github.js';
import { registerResources } from './resources.js';
import { registerDocsResource } from './docs-resource.js';
import { registerPrompts } from './prompts.js';

export function createServer() {
  const server = new McpServer({ name: 'notes', version: '1.0.0' });

  registerNoteTools(server);    // Example 1
  registerAdminTools(server);   // Example 2
  registerGithubTools(server);  // Example 3
  registerResources(server);    // Example 4
  registerDocsResource(server); // Example 4 (bonus)
  registerPrompts(server);      // Example 5

  return server;
}
EOF

# Type-check everything
npx tsc --noEmit && echo '✅ All good'
Test visually with MCP Inspector
The MCP Inspector is the official browser-based tool for testing servers without any AI app:
npm run inspect
# same as:
npx @modelcontextprotocol/inspector npx tsx src/index.ts- Open the URL printed in your terminal and click Connect.
- Open the Tools tab → run
add-note, thenlist-notes. - Try
delete-notewith id99to see your error message. - Open the Resources and Prompts tabs to check those too.
Example 6: An automated test client
Clicking around is great, but an automated script catches regressions. Install the client package and create a quick smoke test:
npm install @modelcontextprotocol/client

cat > src/test-client.ts <<'EOF'
import { Client } from '@modelcontextprotocol/client';
import { StdioClientTransport } from '@modelcontextprotocol/client/stdio';

const client = new Client({ name: 'smoke-test', version: '1.0.0' });
const transport = new StdioClientTransport({ command: 'npx', args: ['tsx', 'src/index.ts'] });

await client.connect(transport);
console.log('Connected to', client.getServerVersion());

// 1. Which tools does the server expose?
const { tools } = await client.listTools();
console.log('Tools:', tools.map(t => t.name));

// 2. Call a tool
const added = await client.callTool({
  name: 'add-note',
  arguments: { title: 'Test', body: 'Hello from the test client' }
});
console.log(added.content);

// 3. Read a resource
const { contents } = await client.readResource({ uri: 'notes://1' });
console.log(contents[0]);

await client.close();
EOF$ npx tsx src/test-client.ts
Connected to { name: 'notes', version: '1.0.0' }
Tools: [ 'add-note', 'list-notes', 'search-notes', 'delete-note', 'get-note', 'get-github-repo' ]
[ { type: 'text', text: 'Saved note #1: Test' } ]
{ uri: 'notes://1', mimeType: 'application/json', text: '{ "id": 1, "title": "Test", ... }' }Tip: Run this in CI (GitHub Actions) on every push so you never ship a broken server.
Going remote: Streamable HTTP server
stdio is perfect for local use, but if you want other people (or a web app) to use your server, run it over Streamable HTTP. Because we kept createServer() separate, this is only a few lines:
npm install @modelcontextprotocol/express @modelcontextprotocol/node express

cat > src/http.ts <<'EOF'
import { createMcpExpressApp } from '@modelcontextprotocol/express';
import { toNodeHandler } from '@modelcontextprotocol/node';
import { createMcpHandler } from '@modelcontextprotocol/server';
import { createServer } from './server.js';

const handler = createMcpHandler(() => createServer());

const app = createMcpExpressApp(); // adds JSON parsing + DNS-rebinding protection
const node = toNodeHandler(handler);

app.all('/mcp', (req, res) => void node(req, res, req.body));

const PORT = Number(process.env.PORT ?? 3000);
app.listen(PORT, () => console.error(`MCP server on http://localhost:${PORT}/mcp`));
EOF

# Start the remote server
npx tsx src/http.ts
Test it with the Inspector by choosing Streamable HTTP and entering http://localhost:3000/mcp, or connect from code:
cat > src/http-client.ts <<'EOF'
import { Client, StreamableHTTPClientTransport } from '@modelcontextprotocol/client';

const client = new Client({ name: 'my-client', version: '1.0.0' });
await client.connect(new StreamableHTTPClientTransport(new URL('http://localhost:3000/mcp')));

const { tools } = await client.listTools();
console.log('Remote tools:', tools.map(t => t.name));
await client.close();
EOF

# In a second terminal (while src/http.ts is running)
npx tsx src/http-client.ts| stdio | Streamable HTTP | |
|---|---|---|
| Runs | On the user’s machine | On your server / cloud (Vercel, Railway, Render, AWS…) |
| Users | One | Many |
| Best for | Local files, dev tools, personal automation | SaaS products, team tools, public APIs |
| Auth | Not needed | OAuth strongly recommended |
| Logging | Only console.error (stdout is the protocol) | Any logger |
Connect your MCP server to AI apps
These commands build the project and write each app’s config with the correct absolute path filled in automatically via $(pwd). Run them from inside the notes-mcp folder.
Claude Desktop
npm run build   # creates dist/index.js

CONFIG="$HOME/Library/Application Support/Claude/claude_desktop_config.json"
mkdir -p "$(dirname "$CONFIG")"
[ -f "$CONFIG" ] && cp "$CONFIG" "$CONFIG.backup"   # keep a backup!

# ⚠️ This replaces the file. If you already have other servers, merge by hand.
cat > "$CONFIG" <<EOF
{
  "mcpServers": {
    "notes": {
      "command": "node",
      "args": ["$(pwd)/dist/index.js"],
      "env": { "GITHUB_TOKEN": "your-token-here" }
    }
  }
}
EOF
VS Code (GitHub Copilot agent mode)
mkdir -p .vscode
cat > .vscode/mcp.json <<EOF
{
  "servers": {
    "notes": {
      "type": "stdio",
      "command": "node",
      "args": ["$(pwd)/dist/index.js"]
    }
  }
}
EOF
Cursor
mkdir -p .cursor
cat > .cursor/mcp.json <<EOF
{
  "mcpServers": {
    "notes": {
      "command": "node",
      "args": ["$(pwd)/dist/index.js"]
    }
  }
}
EOF
Restart the app and try prompts like:
- “Save a note called Sprint goals: finish the login page and write tests.”
- “Search my notes for login.”
- “How many stars does vercel/next.js have? Save the answer as a note.”
Best practices for production MCP servers
- Write tool descriptions for the AI. Say what it does, when to use it, and what it returns.
- Keep tools small and focused.
search-notes+add-notebeats one giantnotestool with amodeflag. - Use clear, consistent names like
verb-noun(get-repo,create-issue). - Validate everything with Zod – never trust inputs, even from an AI.
- Return helpful errors with hints to recover (“Known ids: 1, 2, 5”).
- Protect dangerous actions. Avoid exposing deletes, payments or emails without confirmation.
- Keep secrets in environment variables and never return them in tool results.
- Keep outputs short. Huge responses waste the model’s context window – paginate or summarise.
- Add auth for remote servers and rate-limit public endpoints.
Common errors and fixes
| Error / symptom | Fix |
|---|---|
Cannot use import statement outside a module | Add "type": "module" to package.json. |
Cannot find name 'process' (or node:fs) | Run npm i -D @types/node and add "types": ["node"] to tsconfig.json. |
ERR_MODULE_NOT_FOUND ./server | With NodeNext, import local files with .js: './server.js'. |
| Server not showing in the AI app | Use absolute paths, check the JSON is valid, fully quit and restart the app. |
| Connection breaks randomly (stdio) | Don’t use console.log – it writes to stdout. Use console.error. |
| AI never calls your tool | Improve the description and field .describe() hints; mention typical user phrases. |
| Code from an old tutorial doesn’t compile | It’s probably SDK v1 (@modelcontextprotocol/sdk). Use the v2 imports shown here. |
Frequently Asked Questions
Is MCP only for Claude?
No. MCP is an open standard supported by many AI apps, IDEs (VS Code, Cursor, JetBrains) and agent frameworks.
Can I build an MCP server in Python?
Yes. There’s an official Python SDK too. Tools, resources and prompts work the same way – only the syntax changes.
What’s the difference between MCP SDK v1 and v2?
v2 implements the newer MCP spec and splits the SDK into @modelcontextprotocol/server and @modelcontextprotocol/client, plus adapters like @modelcontextprotocol/express. v1 used one @modelcontextprotocol/sdk package.
Tools vs resources – which should I use?
Use a tool when the AI should decide to take an action or fetch something on demand. Use a resource for data the app or user attaches as context, like a file or a record.
Do I need a database?
Not to start – this tutorial uses an in-memory Map. For real use, connect PostgreSQL, MongoDB, Supabase or SQLite inside your handlers.
Where can I deploy a remote MCP server?
Anywhere that runs Node.js: Vercel, Railway, Render, Fly.io, AWS, or your own VPS. Put it behind HTTPS and add authentication.
Conclusion
You built a complete MCP server in TypeScript: six tools (including a live GitHub integration), resources, prompts, proper error handling, an automated test client and a remote HTTP version – and you connected it to Claude, VS Code and Cursor.
Next challenges to try:
- Swap the in-memory
Mapfor PostgreSQL or Supabase. - Add a
create-github-issuetool (with a confirmation step!). - Deploy the HTTP server and share it with your team.
AI, frontend, backend and career guides for developers. Bookmark devdojo.co.in and level up daily. Brush up on async code with our JavaScript Promises guide.
Reference: Official MCP TypeScript SDK documentation