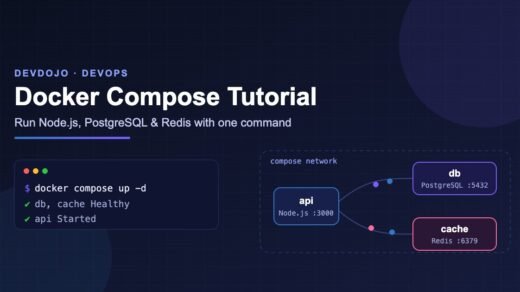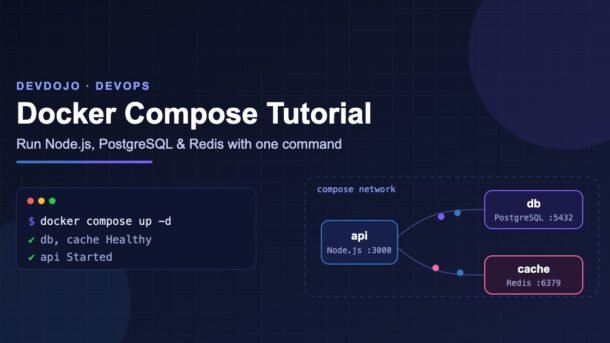
If you have ever followed a project’s README that says “install Node, then install PostgreSQL, then install Redis, then set ten environment variables”, you know how painful local setup can be. This Docker Compose tutorial fixes that. You will write one small file, run one command, and get a working Node.js API talking to a PostgreSQL database and a Redis cache — on any laptop, Windows, macOS or Linux.
- Docker Compose lets you describe many containers (API, database, cache) in one
compose.yamlfile and start them all withdocker compose up. - Services talk to each other using their service names (like
dbandcache), notlocalhost. - Use health checks with
depends_on: condition: service_healthyso your API waits until the database is really ready. - Use named volumes so your database data survives restarts. For PostgreSQL 18+, mount the volume at
/var/lib/postgresql. - Use Compose Watch (
docker compose watch) to see code changes live without rebuilding by hand.
What is Docker Compose? (Docker Compose tutorial basics)
Docker runs one container at a time — a small, isolated box that has your app and everything it needs. Real apps usually need more than one box: an API, a database, maybe a cache or a queue. Starting each one with a long docker run ... command, creating networks by hand and remembering the right order gets old quickly.
Docker Compose is the tool that solves this. You write a YAML file that lists your services (containers), how they are built or which image they use, which ports they open, which environment variables they need, and which data should be saved. Then a single command starts the whole stack. Think of it as a recipe card for your whole app.
compose.yaml and is committed to Git with your code.docker compose up builds, creates a network, and starts every service in the right order.Before you start
You need two things:
- Docker Desktop (Windows/macOS) or Docker Engine with the Compose plugin (Linux). Docker Desktop already includes Compose.
- A terminal and a code editor like VS Code.
Check that both Docker and Compose are installed:
docker --version
docker compose versiondocker compose (with a space). The old docker-compose (with a hyphen) was the Python-based version 1, which is no longer maintained. Every command in this guide uses the new form.Project structure
We will build a tiny “visit counter” API. Every time you open it, it saves a row in PostgreSQL and increases a counter in Redis. Simple, but it touches every important Compose feature. Create this folder layout:
my-app/
├── compose.yaml
├── .env
└── api/
    ├── Dockerfile
    ├── .dockerignore
    ├── package.json
    └── src/
        └── index.js
Step 1: The Node.js API
First, the package.json. We use ES modules ("type": "module"), Express 5, the pg driver for PostgreSQL and the official redis client.
{
  "name": "visit-counter-api",
  "version": "1.0.0",
  "type": "module",
  "scripts": {
    "start": "node src/index.js",
    "dev": "node --watch src/index.js"
  },
  "dependencies": {
    "express": "^5.1.0",
    "pg": "^8.13.0",
    "redis": "^5.0.0"
  }
}
Now the API itself. Notice that it does not hard-code any hostnames or passwords. It reads DATABASE_URL and REDIS_URL from environment variables, which Compose will provide.
import express from 'express';
import pg from 'pg';
import { createClient } from 'redis';

const app = express();

// PostgreSQL connection pool (host comes from DATABASE_URL)
const pool = new pg.Pool({ connectionString: process.env.DATABASE_URL });

// Redis client (host comes from REDIS_URL)
const cache = createClient({ url: process.env.REDIS_URL });
cache.on('error', (err) => console.error('Redis error:', err.message));
await cache.connect();

// Create the table once, if it does not exist yet
await pool.query(`
  CREATE TABLE IF NOT EXISTS visits (
    id SERIAL PRIMARY KEY,
    visited_at TIMESTAMPTZ NOT NULL DEFAULT now()
  )
`);

app.get('/', async (req, res) => {
  await pool.query('INSERT INTO visits DEFAULT VALUES');
  const { rows } = await pool.query('SELECT COUNT(*)::int AS total FROM visits');
  const hits = await cache.incr('hits');

  res.json({
    message: 'Hello from Docker Compose!',
    totalVisits: rows[0].total, // stored in PostgreSQL
    cacheHits: hits             // stored in Redis
  });
});

app.get('/health', (req, res) => res.json({ status: 'ok' }));

const port = process.env.PORT || 3000;
app.listen(port, () => console.log(`API running on port ${port}`));await works here because the file is an ES module. If the database is not ready, this code would crash on startup — that is exactly why we will add health checks in Step 3.Step 2: The Dockerfile
The Dockerfile tells Docker how to build an image for our API. We use the official node:24-alpine image (Node.js 24 is an LTS release, and Alpine keeps the image small).
FROM node:24-alpine

WORKDIR /app

# Copy only package files first, so "npm install" is cached
COPY package*.json ./
RUN npm install --omit=dev

# Now copy the rest of the source code
COPY . .

EXPOSE 3000
CMD ["npm", "start"]
And a .dockerignore so your local node_modules and secrets never get copied into the image:
node_modules
npm-debug.log
.envpackage.json first? Docker caches each step. If you only change index.js, Docker reuses the cached npm install layer, so rebuilds take seconds instead of minutes.Step 3: The compose.yaml file
This is the heart of the Docker Compose tutorial. First, put your settings in a .env file next to compose.yaml. Compose reads this file automatically and replaces ${VARIABLE} placeholders with these values.
POSTGRES_USER=devdojo
POSTGRES_PASSWORD=change-me-please
POSTGRES_DB=appdb.env to your .gitignore. Commit a .env.example with dummy values instead, so teammates know which variables they need.Now the main file:
compose.yamlservices:
api:
build: ./api
ports:
- "3000:3000"
environment:
DATABASE_URL: postgres://${POSTGRES_USER}:${POSTGRES_PASSWORD}@db:5432/${POSTGRES_DB}
REDIS_URL: redis://cache:6379
depends_on:
db:
condition: service_healthy
cache:
condition: service_healthy
restart: unless-stopped
db:
image: postgres:18-alpine
environment:
POSTGRES_USER: ${POSTGRES_USER}
POSTGRES_PASSWORD: ${POSTGRES_PASSWORD}
POSTGRES_DB: ${POSTGRES_DB}
volumes:
- db-data:/var/lib/postgresql
healthcheck:
test: ["CMD-SHELL", "pg_isready -U $${POSTGRES_USER} -d $${POSTGRES_DB}"]
interval: 5s
timeout: 3s
retries: 10
start_period: 10s
cache:
image: redis:8-alpine
healthcheck:
test: ["CMD", "redis-cli", "ping"]
interval: 5s
timeout: 3s
retries: 10
volumes:
db-data:What each part means
| Key | What it does |
|---|---|
services | The list of containers. Each name (api, db, cache) also becomes a hostname on the Compose network. |
build: ./api | Build the image from the Dockerfile in the api folder. |
image | Use a ready-made image from Docker Hub instead of building one. |
ports: "3000:3000" | HOST:CONTAINER. Opens container port 3000 on your computer’s port 3000. The database has no ports, so it stays private. |
environment | Environment variables passed into the container. |
depends_on + condition: service_healthy | Do not start api until db and cache pass their health checks. |
healthcheck | A command Docker runs again and again to decide if the service is “healthy”. |
volumes | A named volume (db-data) keeps the database files even when the container is removed. |
restart: unless-stopped | Restart the API automatically if it crashes, unless you stopped it yourself. |
$$ in the health check? A single ${POSTGRES_USER} is replaced by Compose when it reads the file. Writing $${POSTGRES_USER} tells Compose “leave this alone”, so the shell inside the container reads its own environment variable instead./var/lib/postgresql. Mount your volume there (as above), not at the old /var/lib/postgresql/data. See the official postgres image page for details. Curious about what is coming next in Postgres? Read our post on PostgreSQL 19 new features.depends_on only waits for the container to start, not for PostgreSQL to accept connections.Step 4: Run and test it
From the my-app folder, build and start everything in the background:
docker compose up -d --buildCheck that all three services are running and healthy:
docker compose psYou should see db and cache marked healthy and api marked Up. Now call the API (or open it in your browser):
curl http://localhost:3000
# {"message":"Hello from Docker Compose!","totalVisits":1,"cacheHits":1}

curl http://localhost:3000
# {"message":"Hello from Docker Compose!","totalVisits":2,"cacheHits":2}
Let’s peek inside the database and the cache directly, using docker compose exec to run commands inside running containers:
# Count rows in PostgreSQL
docker compose exec db psql -U devdojo -d appdb -c "SELECT COUNT(*) FROM visits;"

# Read the counter from Redis
docker compose exec cache redis-cli GET hits
Now stop everything and start it again:
docker compose down
docker compose up -d
curl http://localhost:3000
The totalVisits number keeps growing, because PostgreSQL data lives in the db-data volume. The Redis counter, however, starts over — we did not give Redis a volume. That is fine for a cache, and it is a good way to see the difference volumes make.
Step 5: Live reload with Compose Watch
Right now, if you edit index.js you must run docker compose up -d --build again. Compose Watch automates this: it watches files on your computer and updates the container for you. You add a develop.watch section to the service and pick an action. Click the tabs below to compare the three main actions:
Copies changed files into the running container. Best when the app already reloads itself (Node’s --watch, Vite, Next.js dev server, Nodemon). Fastest option.
  api:
    build: ./api
    command: npm run dev   # runs "node --watch"
    develop:
      watch:
        - action: sync
          path: ./api/src
          target: /app/src
Copies changed files, then restarts the container. Good when your app does not reload by itself, or for config files such as nginx.conf.
  api:
    build: ./api
    develop:
      watch:
        - action: sync+restart
          path: ./api/src
          target: /app/src
Builds a fresh image and replaces the container. Use it for changes that need a new image, like adding a package to package.json.
  api:
    build: ./api
    develop:
      watch:
        - action: rebuild
          path: ./api/package.json
In practice you combine them. Here is the api service with the recommended setup — sync source code, rebuild when dependencies change:
  api:
    build: ./api
    command: npm run dev
    ports:
      - "3000:3000"
    environment:
      DATABASE_URL: postgres://${POSTGRES_USER}:${POSTGRES_PASSWORD}@db:5432/${POSTGRES_DB}
      REDIS_URL: redis://cache:6379
    depends_on:
      db:
        condition: service_healthy
      cache:
        condition: service_healthy
    develop:
      watch:
        - action: sync
          path: ./api/src
          target: /app/src
        - action: rebuild
          path: ./api/package.json
Start it with watch mode turned on:
docker compose up --watch
# or, to only see watch events:
docker compose watch
Change the message text in index.js, save, and refresh localhost:3000. You will see the new message within a second or two — no rebuild needed. Read more in the official Compose Watch docs.
Everyday Docker Compose commands
You will use these commands almost every day. Bookmark this table:
| Command | What it does |
|---|---|
docker compose up -d | Start all services in the background (“detached”). |
docker compose up -d --build | Rebuild images first, then start. Use after changing a Dockerfile. |
docker compose ps | List services with their status and health. |
docker compose logs -f api | Follow live logs of one service. Leave out api to see all. |
docker compose exec db sh | Open a shell inside a running container. |
docker compose restart api | Restart just one service. |
docker compose stop | Stop containers but keep them (fast to start again). |
docker compose down | Stop and remove containers and the network. Volumes are kept. |
docker compose down -v | Same, but also deletes volumes — your database data is gone. |
docker compose config | Print the final file with all ${VARIABLES} filled in. Great for debugging. |
Common errors and fixes
These are the problems beginners (and plenty of seniors) hit most often:
| Error / symptom | Why it happens | Fix |
|---|---|---|
connect ECONNREFUSED 127.0.0.1:5432 | Your app uses localhost. Inside a container, localhost means that same container, not the database. | Use the service name as host: db:5432, cache:6379. |
| API crashes on first start, works after restart | The API started before PostgreSQL was ready to accept connections. | Add a healthcheck to db and use depends_on with condition: service_healthy. |
Bind for 0.0.0.0:5432 failed: port is already allocated | Another program (often a locally installed PostgreSQL) already uses that port on your computer. | Stop the other program, or change only the host side: "5433:5432". |
PostgreSQL 18 container exits with an error about the data directory or /var/lib/postgresql/data | The volume is mounted at the old path used by images before version 18. | Mount at /var/lib/postgresql. To upgrade existing data from 17, use pg_dump/restore or pg_upgrade. |
the attribute `version` is obsolete warning | Old tutorials start files with version: "3.8". Modern Compose ignores it. | Delete the version: line. |
The "POSTGRES_USER" variable is not set. Defaulting to a blank string. | Compose cannot find your .env file. | Put .env in the same folder as compose.yaml, or pass --env-file path/to/.env. |
Changed POSTGRES_PASSWORD but login still fails | The POSTGRES_* variables are only used the first time, when the volume is empty. | For local dev, reset with docker compose down -v (deletes data), or change the password with SQL. |
| Code changes do not show up | The image still contains the old code. | Run docker compose up -d --build, or use Compose Watch. |
docker-compose: command not found | You are using the retired v1 command name. | Use docker compose (with a space). |
Best practices
- Name the file
compose.yaml. It is the preferred name today.docker-compose.ymlstill works. - Pin major versions of images (
postgres:18-alpine,redis:8-alpine) instead oflatest, so a surprise upgrade never breaks your setup. - Expose only what you need. Leave out
portsfor databases unless you want to connect a GUI tool from your computer. - Keep secrets out of Git. Use
.envlocally and a real secret manager in production. - Always add health checks for databases, caches and message queues.
- Use named volumes for data you care about, and remember that
down -vdeletes them. - Use a
.dockerignoreto keep images small and builds fast. - Use profiles for optional tools. Add
profiles: ["tools"]to something like pgAdmin, then start it only when needed withdocker compose --profile tools up. - Run
docker compose configwhen something looks wrong — it shows exactly what Compose sees.
Here is a quick example of an optional database admin tool using a profile:
  pgadmin:
    image: dpage/pgadmin4
    profiles: ["tools"]
    ports:
      - "5050:80"
    environment:
      PGADMIN_DEFAULT_EMAIL: admin@example.com
      PGADMIN_DEFAULT_PASSWORD: admin
    depends_on:
      - db
A normal docker compose up skips it. docker compose --profile tools up -d includes it, and you can open http://localhost:5050 and connect to host db.
FAQ
What is the difference between Docker and Docker Compose?
Docker builds and runs single containers. Docker Compose is a tool on top of Docker that runs many containers together from one YAML file, with a shared network, volumes and start-up order.
Should I name my file compose.yaml or docker-compose.yml?
Both work. compose.yaml is the preferred name in the official Compose specification, so use it for new projects.
Does docker compose down delete my database?
No. down removes containers and the network but keeps named volumes. Only docker compose down -v deletes volumes (and your data).
Can I use Docker Compose in production?
Yes, for small apps on a single server it works well. For many servers, auto-scaling and zero-downtime deploys, teams usually move to Kubernetes or a managed container service. Learning Compose first makes those much easier to understand.
Why can’t my container connect to localhost?
Each container has its own network “home”. Inside the api container, localhost is the API itself. Use the other service’s name (like db) as the hostname.
Does Docker Compose work on Windows?
Yes. Install Docker Desktop (it uses WSL 2 on Windows). For the best file-watching speed, keep your project inside the WSL file system rather than on the Windows C: drive.
Conclusion
You now have a real multi-container setup: a Node.js API, a PostgreSQL database with saved data, and a Redis cache — all started with docker compose up. More importantly, you understand the ideas behind it: services talk by name, health checks control start-up order, volumes keep data safe, and Compose Watch gives you fast feedback while coding.
Try extending this project next: add a worker service that reads jobs from Redis, or a frontend service with Vite. The pattern stays exactly the same — one more block in compose.yaml.
New posts every day on DevDojo
Practical, beginner-friendly guides on AI, frontend, backend and DevOps. Bookmark devdojo.co.in and leave a comment below if you got stuck anywhere in this tutorial — we read every one.